 |
| The Hot Border in August |

Showing posts with label garden maintenance. Show all posts
Showing posts with label garden maintenance. Show all posts
Monday, August 15, 2016
August Gardening ~ Garden Blogger's Bloom Day August 2016

Thursday, October 1, 2015
Pruning Daylilies
Herbaceous pruning (cutting the foliage of perennial plants) has a few uses. Often, it is used to delay the bloom of a plant, or to make it have better branching instead of just one main stem. This is known across the pond as the "Chelsea Chop", because gardeners in the UK can plan on cutting their perennials around time of the Chelsea Flower Show. (The show is usually held at the end of May.)
Another good reason for pruning perennial foliage occurs later in the season. During the hot months of July and August, perennial foliage often starts to look old and tattered. For many years, I sighed and assumed that yellowing leaves meant my garden was passing into its fall foliage already.
Another good reason for pruning perennial foliage occurs later in the season. During the hot months of July and August, perennial foliage often starts to look old and tattered. For many years, I sighed and assumed that yellowing leaves meant my garden was passing into its fall foliage already.
 |
| Before: Hemerocallis waiting for their trim in the Front Woodland |
Thursday, October 30, 2014
End of the Month View: One More Path...
 |
| Pergola Garden with our new pea gravel walk this week. |
Thursday, October 23, 2014
Mow Those Leaves!
 |
| My husband mulching leaves our in the woodland. |
It should be obvious that it is the leaf litter in the forest that helps to supports growth of shade plants. But less known is that there is also a lot of new research that shows how leaves also benefit you lawn. For more explanation of this method, see my old post on mowing your leaves in fall.
Tuesday, November 26, 2013
Heeling in Pots for a Cold Winter!
So, did you buy those extra bargains at the end-of-year plant sales only to get home and not know where to put them?
Do you have more plants potted up than you have space for in your garden beds?
A potted perennial in the open winter air will get much colder than your other plants in the ground. So, if you are not sure where to plant it this moment, then an alternate plan is in order. (A side note: A good rule of thumb when buying plants for pots meant to stay outside all winter is to buy plants/shrubs that can handle one or even two hardiness zones colder than where you live.)
One option for your homeless perennials is to "heel in" your plants for the winter months. I believe it is called this because you are burying the pots up to their "heels".
- First, I like to chose a location with a little bit of shelter (ie. a nearby bush, a fence or wall) but it needs not to be covered completely because you want your plant to be watered by the rain and snow.
 |
| My chosen spot: near the fence and lilac bush where they can cozy in for the winter. |
- Next, dig a pot-sized hole to 4-6 inches deep. Deeper will give them more warmth, so if they are your prized baby from your grandmother's rose bush, dig a little more.
- "Plant" your pots, filling soil back around their edges. If I have more than one pot, I plant them snug next to one another. Some gardeners dig a trench, which would be much quicker for a large number of pots.
Tuesday, October 15, 2013
Gardening in Pennsylvania ~ October 2013 GBBD
 |
| The Hill Garden with Canna 'King Humbert', Echinacea purpurea, Berberis purpurea, and glorious yellow maples (Acer) leaves for autumn. |
I would be delighted to show you around our corner here in US zone 5. The foliage colors are intensifying this month, though they have not yet reached their climax. Our first frost is still on its way this year. Hurray for a few more weeks with tender plants in the garden! The begonias, cannas, dahlias and annuals are still adding their pretty bit to the mix. Come talk a walk around...
Thursday, August 15, 2013
Gardening in Pennsylvania ~ GBBD August 2013
 |
| Pink Anemone japonica, Spirea 'Goldflame', red Canna 'King Humbert' and white Cosmos fill the Front Walk garden this week. |
Thursday, June 20, 2013
Climbing Rose and Clematis Combination
 |
| Clematis 'Madam Julia Correvon' blooming with our pink climbing rose. |
The pink climbing rose is blooming this week and oh, so fragrant. Last year I added a clematis to it, and this is the first year they have bloomed together. Clematis 'Madam Julia Correvon' is a beautiful red climber that we also have on a trellis by our Circle Lawn (see it last week).
Tuesday, April 9, 2013
Mulching fun with the kids!
 |
| Mulching season, Spring 2013 |
I think it is the *GIANT* pile of compost that really gets them excited. Spring is here and here is something they can finally just dig in to - any way, any how. And, boy, it does seems limitless... especially to the kids. :)
Thursday, April 4, 2013
Tips for Applying Mulch
 |
| Mushroom compost at "Gilmore Garden Center." |
We will have 3 yards of mushroom compost delivered this week. When I begin filling my first wheelbarrow full, I will think about the mulching techniques I have learned from many and various gardeners over the past 10 years...
Thursday, February 21, 2013
Good Gardeners take Notes...
 |
| Time to dust off your garden journal or start a new one! |
They take notes on what blooms when, what the weather is like, what plant combinations they like and which ones they do not. They makes lists of what they need to remember to change in the spring, in the summer, or the fall. And then they read them, do what they recorded, and cross them off!
And this is the moment to start: as flowers begin to bloom!
Saturday, September 15, 2012
Gardening in Pennsylvania ~ GBBD Sept 2012
 |
| Pink Dahlia with Euphorbia 'Diamond Frost' in our Front Walk Garden. |
Thursday, September 6, 2012
Ways to Use A Garden Journal
 |
| My Date Books turned Garden Journals from the past three years. |
One of my favorite garden authors, Rosemary Verey, said,
"Take note as you go... Learn to build up your knowledge of plants, not only to be able to recognize them but to know what growing conditions they like or dislike, when they will flower, what their leaves will contribute before and after flowering, how they will relate to their neighbors. This knowledge comes only with familiarity, observation and experience" (Rosemary Verey's Making of a Garden, page 17).
Wednesday, August 1, 2012
Green Painted Lawn anyone?

Monday, July 16, 2012
Gardening in Pennsylvania ~ GBBD July 2012
 |
| Lavender and purple coneflower (Echinacea purpurea) in the Driveway Garden for July |
Monday, March 26, 2012
Protecting Plants from Spring Frosts
 |
| Tenting in a Clematis on a trellis in the Circle Lawn with an industrial-sized garbage bag during the warmer daytime temperatures to prepare for this evening's cold snap. |
1. Do not panic - For the most part, plants that come out of dormancy in the springtime are accustomed to coping with sudden cold temperatures. Most plants in zone 5 and colder are even able to withstand several inches of snow; once it is melted, they will continue their bloom again where they left off before the snow storm. (I have seen tulips ready to bloom flopped on to the ground, covered in snow, that stood up to bloom when the sun came out again.)
Tuesday, March 6, 2012
Early March Flowers... and some snow
 |
| Crocus 'Goldilocks' in the Driveway Garden... can you see the purple haze in the backyard beyond? March 1st. |
 |
| More of early bloomer Crocus tommasinianus in the Back Woodland and the children playing round and round on the patio. |
 |
| First Hellebores orientalis bloom of the season. |
 |
| A nice, new, though a bit wobbly, garden edge in the Driveway Garden dusted with snow. |
 |
| Shoots of Crocus 'Goldilocks', tulips and daffodils uncovered in the Driveway Garden and braving the snow. |
 |
| The Driveway Garden with a bit of snow, which is often seen coming and going these days. March 5th. |
I have been dealing with some inner ear issues that have made the world swirl about me, but hopefully everything (playing with kids, cooking meals and trying to read, especially on the computer!) will be easier for me by the end of the week. I am still hoping to get out a few more succession planting posts before spring is in full swing; on the other hand, I can't wait to get out in the garden! But both are on hold. My life is a practice of enjoying what there is to enjoy in each day, whether sick or well, snow or sun. I hope that I may lay hold of what is good in life today and be thankful for it!
Happy March!
May the flowers soon be blooming on your doorstep~
Julie
Friday, February 24, 2012
Have you been messy yet today?
 |
| All the best things in life are messy! |
Eating warm chocolate chip cookies...
stomping in mud puddles...

babies... oh, so cute, but definitely messy...
fresh new paint...

What else can get me covered in mud from my knees down in ten minutes, keep me out clipping plants in the rain for an hour, or contrive to lure my hands into gooey mud while strolling around the house?

I love it. And today I am dreaming about it being warm enough to garden in the rain again...
Tuesday, January 3, 2012
Mulch new plants with your Christmas Tree
The cookies have been eaten, the eggnog is drunk. The last party of the season saw the children running around with noisy horns for the new year. December is over, and it is time for that most arduous task: stripping our Christmas tree of its ornaments and lugging it back outside.
This can be depressing for people who loves parties and all the excitement of the holidays, but as gardeners, we can find some redemption even in the dismantling of our treasured decorations.
The weather has continued to be very mild for this time of year, but I am trying not to be lulled into forgetting that the coldest part of the year is yet to come. Some of my plants are in need of extra coverage in January, especially those that were newly planted this past growing season. Their roots are just beginning to establish themselves, not yet fully gripping the soil around them. Also, those in wind-blown areas are often just bare stems and earth by this time since the wind has stolen their leaf cover. This is where our dearly loved Christmas tree comes in to help.
After hauling/tossing/lugging your tree outdoors, cut off the branches where they meet the trunk. Use these to create a framework around the stems of your precious plants. I usually use 3-4 medium branches per plant, though windier areas my call for using larger and/or more evergreens. This teepee-like-framework will filter the desiccating winds of winter.
For ease and in warmer climates, the branches may be enough cover for the winter.
But if you live in a cold zone 5 or higher, you might want to consider taking an extra step on an unfrozen day to protect your plants: Grab handfuls of leaves from elsewhere in your yard and tuck them in and under the evergreen branches. Or do this process in reverse: first pile the leaves around the plant, and then add the branches on top. Either way, this will hold your extra winter cover in place through wind, snow and rain.
An added bonus: the evergreen branches look really pretty scattered in your garden boarders with a dusting of snow!
In the first growth of spring, after the weather is less constantly icy, pick up the branches from your plant and scatter the leaves so that you can watch it come out of dormancy. Another winter gone by... oh, for that day!
Merry un-trimming to you!
This can be depressing for people who loves parties and all the excitement of the holidays, but as gardeners, we can find some redemption even in the dismantling of our treasured decorations.
The weather has continued to be very mild for this time of year, but I am trying not to be lulled into forgetting that the coldest part of the year is yet to come. Some of my plants are in need of extra coverage in January, especially those that were newly planted this past growing season. Their roots are just beginning to establish themselves, not yet fully gripping the soil around them. Also, those in wind-blown areas are often just bare stems and earth by this time since the wind has stolen their leaf cover. This is where our dearly loved Christmas tree comes in to help.
 |
| Stems of a newly planted hibiscus made bare by the wind |
 |
| Evergreen branches set in a sort of teepee around the plant. |
But if you live in a cold zone 5 or higher, you might want to consider taking an extra step on an unfrozen day to protect your plants: Grab handfuls of leaves from elsewhere in your yard and tuck them in and under the evergreen branches. Or do this process in reverse: first pile the leaves around the plant, and then add the branches on top. Either way, this will hold your extra winter cover in place through wind, snow and rain.
 |
| Leaf litter tucked into the branches around the hibiscus and the newly transplanted lavender (at left) |
 |
| My new OSO Easy Rose 'Paprika' surrounded by evergreen cover to help it establish. |
 |
| This photo just taken this evening after our snow fall - finally! |
Merry un-trimming to you!
Monday, December 12, 2011
Core Aeration for Lawns: Fall Gardening Task #9
 |
| Core aerate in the fall for compacted lawns |
The nice weather has afforded me enough time this late-late fall to work on another garden problem: worn and compacted turf. It really is only in spots, but it is not so nice to begin a walk around the garden with a stomp through the mud at the gate. Since this is a narrow spot, it gets a lot of abuse from feet big and little. And there are also a few more areas of lawn that have been reseeded each spring with little permanent success. Some more research was in order.
 |
| Gate Lawn aerated and starting to breath easier before winter wetness |
Then I went looking and found this thorough article on Yardener about lawn care which suggests core aeration in the fall also. This article talks about using a machine or a hand tool.
After a moment of reflection, fall core aeration made wonderful sense to me though it is an uncommon practice in the US. The purposes of core aeration are to relieve compaction, increase drainage, and stimulate root growth by root pruning. Perennial gardeners know when it is time to root prune: before winter, because it is in winter when root growth happens. Drained is also needed the most during the wet winter season. Fall coring gives your lawn all of these advantages.
Plus, Yardener's best idea: core the lawn, then mow in your fall leaves for mulch and break up the core plugs all at once. Brilliant! I missed my opprotunity this year, but I want to remember for next year.
More benefits to core aerating in fall instead of the spring: the kids are not outside playing in dirt plugs during this colder weather; the crocuses blooms are not displayed above a multitude of yucky core plugs. Enough said.
A hand tool was very interesting to me since our yard is pretty small and the trouble spots even smaller. Wouldn't it be nice to be able to aerate small areas when I felt it needed it without needing to rent equipment? Especially when renting a core aerator runs $75 per day?!?
 |
| Hand Core Aerator on completed lawn |
Since there were none available locally, I decided to order one from Amazon. I chose Yard Butler D-6C Core Lawn Aerator for anyone interested. (Note: I am not paid for any of my product suggestions.) After having used it for a couple hours on a warmer day, I am really pleased with it. It is as sturdy as I hoped and does the job easily. It is now my second favorite tool, though far behind my Japanese soil knife of course.
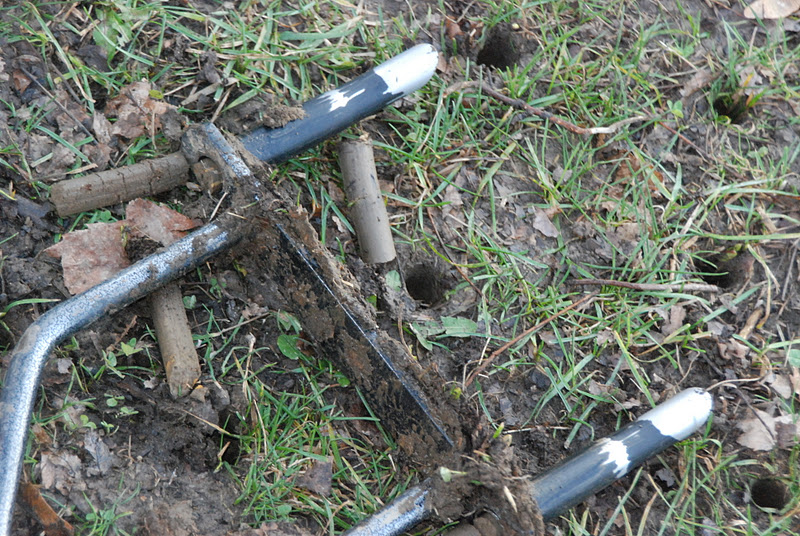 |
| Cores lay on the lawn to break down and add nutrients to the surface |
 |
| You can see the previous cores coming out the top while hubby steps again. |
To finish up, I decided to try raking in a little coarse sand as Libby suggested for her clay turf (see top photo). I am hopeful that it will increase the drainage even further in these compacted areas and help our turf mixed with white clover struggle to success.
Fall Gardening Tasks Series:
#1 Planting Lavender in wet climates
#2 New perennials for fall planting#3 Thin Perennial Seedlings
#4 Bring in the tender plants
#5 Mowing leaves into Turf
# 6 Planting Spring Bulbs
# 7 Edging and Removing Turf#8 Heeling in- Quick Winter Perennial Storage
